
A stretched monitor image usually means that the source resolution, graphics scaling mode, or monitor aspect-ratio setting does not match the display. The fastest fix is to select the affected monitor, return it to its native or recommended resolution, and use a scaling mode that preserves the original proportions.
Do not begin by changing random settings. First identify whether the problem affects the entire desktop, only one application, only one game, or only a second monitor. That detail tells you which part of the display chain to check.
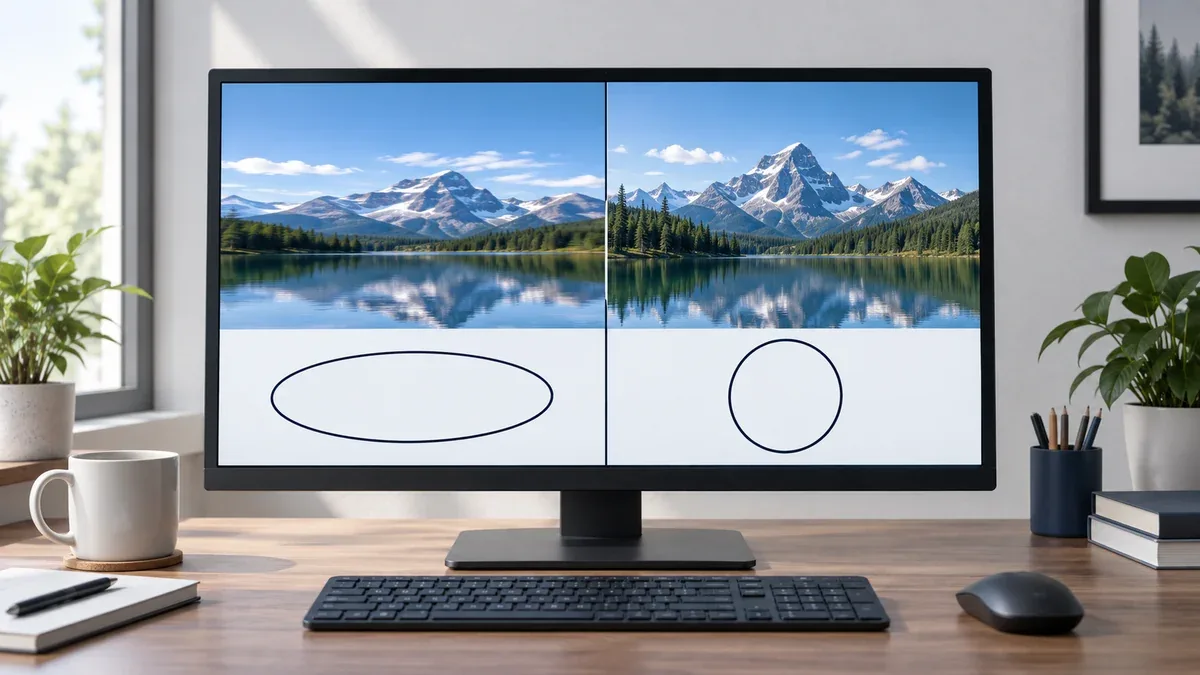
Quick Answer: How to Fix a Stretched Screen
- Select the monitor that looks wrong.
- Set its resolution to the operating system's Recommended or native value.
- Check that display orientation is correct.
- In the graphics control panel, choose Maintain Aspect Ratio, Aspect Ratio, or an equivalent mode.
- In the monitor's on-screen display, choose Original, Auto, 1:1, or the native ratio instead of a forced wide mode.
- If only one game or video is wrong, change that application's resolution and aspect-ratio setting rather than the whole desktop.
If the correct resolution is missing, test the cable, adapter, dock, graphics driver, and monitor identification data before creating a custom resolution.
Aspect Ratio, Resolution and Scaling Are Different
These terms are related, but they describe different parts of the image.
Aspect Ratio
Aspect ratio describes the proportional relationship between width and height. A 16:9 image is about 1.78 times wider than it is high. A 4:3 image is about 1.33 times wider than it is high.
Resolution
Resolution describes the number of pixels in the image, such as 1920 × 1080. Many resolutions share the same aspect ratio. For example, 1920 × 1080, 2560 × 1440 and 3840 × 2160 are all 16:9.
Scaling
Scaling controls how a source image is fitted onto the monitor. A graphics card or monitor can preserve the source proportions, stretch it to fill the panel, or show it at its original pixel size.
Windows text scaling, such as 125% or 150%, is different again. It changes the size of interface elements and text. It normally does not change the geometric aspect ratio of the image.
| Resolution | Exact or common ratio | Typical use |
|---|---|---|
| 1024 × 768 | 4:3 | Legacy PCs, older software and industrial systems |
| 1280 × 1024 | 5:4 | Legacy 17-inch and 19-inch LCD monitors |
| 1920 × 1080 | 16:9 | Common Full HD monitor format |
| 1920 × 1200 | 16:10 | Office and productivity displays |
| 2560 × 1440 | 16:9 | QHD gaming and office displays |
| 3440 × 1440 | 43:18, marketed as 21:9 | Ultrawide monitors |
| 3840 × 2160 | 16:9 | 4K UHD displays |
| 5120 × 1440 | 32:9 | Super-ultrawide monitors |
When you need the physical width and height of a display rather than its pixel ratio, use the Monitor Size Calculator.
What Causes a Monitor Image to Look Stretched?
A stretched image usually comes from a mismatch at one of three layers.
1. The Source Uses the Wrong Resolution
A 4:3 or 5:4 signal sent to a 16:9 monitor does not naturally fill the whole panel. If the system forces that image across the full width, people, circles and text become too wide.
2. The Graphics Driver Forces Full-Screen Scaling
NVIDIA, AMD and Intel graphics controls can scale a lower-resolution source before it reaches the monitor. Full-screen or stretched scaling fills the panel but can change the source proportions. Aspect-ratio scaling preserves shape and may add black bars.
3. The Monitor OSD Forces a Wide Mode
Many monitors include an aspect or image-size option in the on-screen display. A setting such as Wide, Full or 16:9 can stretch a narrower source. Original, Auto, Aspect, 1:1 or a ratio-specific option normally preserves it, but the exact names differ by model.
More than one layer can scale the image. For predictable results, change one setting at a time and recheck the picture before moving to the next layer.
How to Change Monitor Aspect Ratio in Windows 11 and Windows 10
The steps below still apply to Windows 10, although Microsoft ended standard Windows 10 support on October 14, 2025. Windows 11 users should use the current Settings interface described here.
Step 1: Select the Correct Display
- Open Settings.
- Go to System > Display.
- If several monitors are connected, use Identify.
- Select the display that looks stretched.
This step matters because Windows stores many settings separately for each display. Changing Display 1 will not repair Display 2.
Step 2: Use the Recommended Resolution
Under Scale & layout, open Display resolution and choose the value marked Recommended. That value is normally the monitor's native resolution.
If a 1920 × 1080 monitor is running at 1280 × 1024, the ratios do not match. Returning to 1920 × 1080 usually removes the desktop distortion without additional scaling changes.
Step 3: Confirm Orientation
Check Display orientation. Use Landscape for a normally positioned widescreen monitor and Portrait only when the screen has been physically rotated. Orientation errors usually rotate the desktop rather than stretch it, but they are easy to rule out.
Step 4: Check Refresh Rate Separately
Open Advanced display, select the same monitor, and confirm the intended refresh rate. Resolution and refresh rate are separate settings, but some connections support only certain combinations. Selecting a very high refresh rate can make higher resolutions unavailable when the cable, port, dock or graphics output lacks enough bandwidth.
You can compare browser frame timing with the Refresh Rate Test, but a browser cannot confirm every hardware or driver setting.
Step 5: Do Not Use Text Scale to Fix Geometry
The Windows Scale setting changes the apparent size of text and apps. It is useful when content is too small on a high-resolution screen, but it is not the correct control for a circle that appears as an oval. Fix the resolution and aspect-ratio scaling first.
How to Preserve Aspect Ratio in NVIDIA, AMD and Intel Graphics Settings
If the desktop uses a non-native resolution or an older game sends a different ratio, the graphics driver may control how that source fits the panel.
NVIDIA
In the current NVIDIA App, display-scaling controls can appear under System > Displays. The classic path remains common in NVIDIA Control Panel:
- Open NVIDIA Control Panel.
- Under Display, select Adjust desktop size and position.
- Select the affected monitor.
- Choose Aspect ratio to preserve the source proportions.
- Use Full-screen only when intentional stretching is acceptable.
- Use No scaling when you want the image centered at its original size.
The NVIDIA scaling page may allow scaling on the GPU or display. Availability depends on the GPU, driver and connection. On some hybrid-graphics laptops, the internal screen is driven by the integrated GPU, so NVIDIA display controls may not appear; use the control panel for the GPU that actually drives that output.
AMD
- Open AMD Software and go to the display settings.
- Enable GPU Scaling if the option is available.
- Choose Preserve aspect ratio to keep the correct shape.
- Full panel fills the screen and may stretch a mismatched source.
- Center leaves the image at its original size and may add borders.
Intel
- Open Intel Graphics Software or Intel Graphics Command Center, depending on the system.
- Select Display and choose the affected monitor.
- Find the scaling control.
- Choose Maintain Aspect Ratio rather than Stretched.
Intel may also show Centered, Maintain Display Scaling or Custom options. Exact availability depends on the driver and display connection.
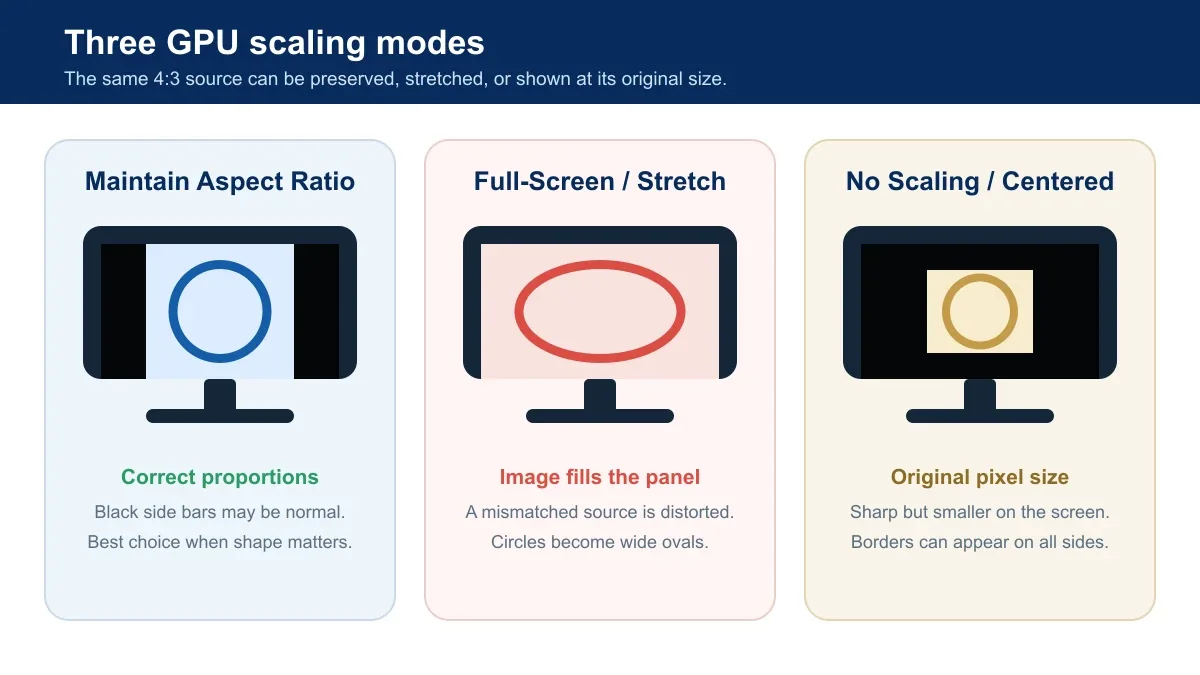
Important: Black bars are not always a fault. They are often the correct result when a 4:3 or 5:4 source is displayed on a 16:9 panel without distortion.
How to Change Aspect Ratio in the Monitor OSD
Use the monitor's physical buttons or joystick to open its on-screen display. Look under Picture, Display, Screen, Image Size, Ratio or Aspect Control.
| OSD term | Typical behavior | When to use it |
|---|---|---|
| Original / Aspect / Auto | Preserves the incoming proportions | Best starting point for mixed source ratios |
| Wide / Full | Fills the panel | Use only when the source already matches or stretching is intended |
| 1:1 | Maps source pixels without enlarging them | Useful for checking exact pixel output |
| 4:3 / 5:4 / 16:9 | Forces a selected ratio | Useful for a known legacy source |
Not every monitor offers all these choices. Some settings are disabled at the native resolution, over certain inputs, or when features such as picture-by-picture are active. Consult the manual for the exact model instead of assuming every Acer, ASUS, Dell or LG monitor uses the same menu.
How to Fix Black Bars Without Stretching the Image
First determine whether the bars are correct.
- Bars on the left and right: the source is narrower than the display, such as 4:3 content on a 16:9 monitor.
- Bars above and below: the source is wider than the display or uses a cinema format.
- Borders on all sides: no scaling, underscan, or a smaller centered resolution may be active.
If the source and monitor have different ratios, you cannot remove every bar while also preserving the complete image and its correct shape. You must choose between bars, cropping or stretching.
If both the source and panel are 16:9 but bars remain, check the recommended resolution, GPU scaling, monitor OSD, and any overscan or underscan control. TVs connected as monitors may expose additional overscan settings.
A uniform border on all four sides often points to Center, No Scaling, 1:1 or HDMI underscan. If the taskbar or picture edges are cut off instead, overscan is more likely. On a TV or TV-like display, look for PC Mode, Just Scan, Screen Fit, Full Pixel or an equivalent setting before applying a graphics-driver resize.
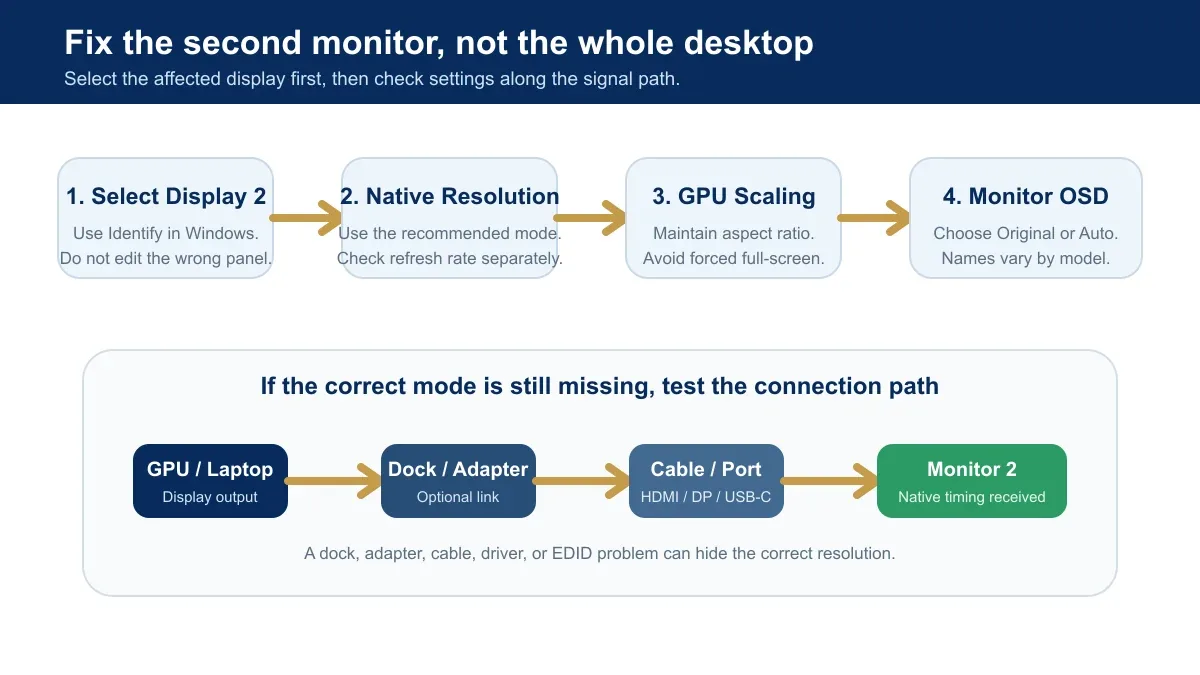
How to Fix Aspect Ratio on a Second Monitor
Second-monitor problems are often caused by editing the wrong display or by a limitation elsewhere in the connection path.
- In Windows Display settings, select Identify.
- Select the monitor with the stretched image.
- Set that display to its recommended resolution.
- Check its refresh rate under Advanced display.
- Apply aspect-ratio scaling to that output in the graphics control panel.
- Check the OSD setting on that physical monitor.
- If the correct resolution is absent, connect the monitor directly to the computer and temporarily bypass the dock, KVM or adapter.
Duplicate mode can also create compromises when two displays have different native ratios or resolutions because both screens must show the same desktop mode. If possible, test Extend mode so each monitor can use its own native resolution and refresh rate.
A missing native resolution can indicate incomplete or incorrect monitor identification data. The graphics system normally reads EDID from the display to learn its supported timings. You can inspect an exported file with the Monitor EDID Tool, but do not edit or replace EDID unless you understand the hardware and recovery path.
How to Change Monitor Resolution and Scaling on macOS
- Open the Apple menu and choose System Settings.
- Select Displays.
- Select the external display you want to change.
- Choose Default for the display or select an appropriate resolution.
- If needed, enable Show all resolutions.
On macOS, the choices shown depend on the Mac, monitor, cable, adapter and current refresh rate. A scaled mode can also affect performance. If a new resolution produces no picture, wait for macOS to revert or press Escape.
When mirroring two displays with different shapes, macOS may have to add borders or optimize for one screen. Extending the desktop usually allows each display to use a more suitable resolution.
Third-party monitors may still require their own OSD controls. macOS cannot replace a monitor-side Wide or Full setting that is forcing the incoming image to stretch.
When Only a Game or Video Looks Stretched
If the desktop is correct but one game is stretched, keep the operating-system settings unchanged and inspect the game first.
- Select the monitor's native resolution in the game.
- Choose the correct aspect ratio when the game provides a separate option.
- Compare Fullscreen, Borderless and Windowed modes.
- Disable forced stretching in the GPU control panel.
- For older 4:3 games, use preserved aspect ratio or integer scaling where supported.
If only one online video has bars or looks wide, the problem may be encoded into the video itself. Changing the monitor cannot restore information that is missing from the source.
Symptom-Based Troubleshooting
| Symptom | Likely cause | First action |
|---|---|---|
| Everything is too wide | Wrong resolution or full-screen scaling | Use the recommended resolution, then Maintain Aspect Ratio |
| Only one game is stretched | In-game resolution or GPU override | Change the game's display mode and ratio |
| Black bars at both sides | Narrower source shown correctly | Keep the bars or use cropping; do not stretch by default |
| Desktop is smaller with a border | No scaling, underscan or centered mode | Check GPU and monitor scaling controls |
| Only the second monitor is wrong | Wrong display selected or connection limitation | Select Display 2 and use its native mode |
| Correct resolution is missing | Driver, cable, dock, adapter or EDID issue | Connect directly and retest the signal path |
| Text is too small but shapes are correct | Interface scaling, not aspect ratio | Adjust Windows or macOS text/display scaling |
| Edges are cut off on a TV | Overscan | Use PC mode, Just Scan, Screen Fit or an overscan control |
Should You Create a Custom Resolution?
A custom resolution should not be the first repair. Start with the monitor's advertised native timing, a direct cable connection, current graphics software and the correct scaling mode.
Unsupported timing values can produce a blank screen, unstable image or out-of-range message. They can also hide the real cause, such as a dock that does not pass the required mode. Use custom timings only when the display specification supports them and you have a clear way to return to a working mode.
Why Aspect-Ratio Problems Matter in Monitor Projects
For an individual user, a stretched desktop is inconvenient. For an OEM or commercial monitor project, incorrect timings or scaling defaults can affect an entire production batch.
Important checks can include native resolution, EDID timing blocks, input behavior, monitor OSD defaults, GPU compatibility and how legacy ratios are displayed. A pre-production sample should be tested with the actual computers, docks, KVMs and software used by the customer.
Yanxun Display develops gaming monitors and office display configurations for OEM and wholesale projects. Resolution support, scaling behavior, EDID and OSD requirements can be reviewed against the project specification before production.
Frequently Asked Questions
How do I change the aspect ratio on an Acer monitor?
First set Windows or macOS to the monitor's native resolution. Then open the Acer monitor OSD and look for Wide Mode, Aspect, Display Mode or an equivalent option. The exact name and availability vary by model, so use the manual for that monitor rather than instructions for another Acer series.
How do I change the aspect ratio on an ASUS monitor?
Use the recommended resolution in the operating system, then check the ASUS OSD for Aspect Control or a similar image-size setting. Depending on the model and signal, options may include Full, 4:3 or other modes. Some choices can be unavailable at the native resolution.
How do I change the aspect ratio on a Dell monitor?
Select the correct resolution first. In the Dell OSD, check the Display menu for Aspect Ratio, Auto Resize or a related control. Available ratios differ between Dell models and inputs, so confirm the exact menu in the product guide.
How do I change the aspect ratio on an LG monitor?
After setting the native resolution, open the LG OSD and look for Ratio, Wide, Original or 1:1. Original normally follows the incoming signal ratio, while Wide can fill the panel. Names and restrictions vary across LG models.
Why does my monitor show black bars after I select the correct aspect ratio?
The source and panel probably use different proportions. Bars preserve the complete image without stretching it. Removing them requires cropping part of the image or changing its shape unless the source can be switched to a matching ratio.
Why is 1280 × 1024 stretched on a 16:9 monitor?
1280 × 1024 is 5:4, not 16:9. Full-screen scaling expands it across the wider panel. Use Maintain Aspect Ratio to keep its shape, accepting side bars, or switch the source to the monitor's native 16:9 resolution.
Why is the recommended resolution missing?
The graphics driver may not be reading the display's supported modes correctly, or a dock, KVM, adapter, cable or port may limit the connection. Connect the monitor directly, try another suitable cable or port, update the graphics driver and inspect the detected display information.
Can I use different aspect ratios on two monitors?
Yes. In extended-desktop mode, each monitor can normally use its own native resolution and ratio. Select each display separately in the operating system and graphics control panel. Mirrored mode can require a shared mode or add borders.
Does changing Windows Scale change the monitor aspect ratio?
No. Windows Scale changes the size of text, apps and interface elements. It should not turn a circle into an oval. Resolution and display scaling mode control the image geometry.
Is it safe to stretch a 4:3 image to 16:9?
It normally does not damage the monitor, but it distorts the image. People and objects appear wider than intended. Preserve aspect ratio if visual accuracy matters.
Official References
- Microsoft Support: Change Screen Resolution and Layout in Windows
- Microsoft Support: How to Use Multiple Monitors in Windows
- NVIDIA: Scale the Desktop and Preserve Aspect Ratio
- AMD: Enabling and Configuring GPU Scaling
- Intel: Scaling Options in Intel Graphics Command Center
- Apple Support: Change a Mac Display's Resolution